Pages

Friday, March 30, 2012

Davy Crockett and his B'ars

Around here, all things 'boy' have been into all things 'Davy Crockett'.

We have read his biography and started on his autobiography.
We know of his home--"Born on a mountain-top in Tennessee"
We know of his childhood--that he attended school for only four days.
Of his wilderness adventures--how in one year he killed one hundred five b'ars with his rifle Betsy.
Of his time as a woodsman in Tennessee--fighting with General Jackson.
Of his time courting his wife--and how she died and he remarried.
Of his time in  Legislature, and after that, his time as a riverman on the Mississippi.
And of his trip to Texas--and his death at the Alamo.

And oh! how we wish we had a coonskin cap and hunting clothes, just like Davy's!


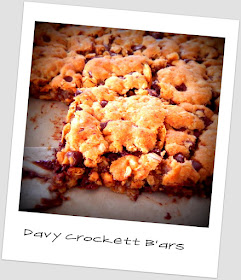
And so, on a whim, I googled "Davy Crockett food" and turned up this recipe for "Davy Crockett's B'ars" on food.com.

Quite simple to make and using ingredients you most likely have on your shelf right now, these 'b'ars' won't last long--the perfect fuel for your wilderness explorer.


Davy Crockett B'ars

Prep Time:  10 minutes
Total Time:  25 minutes
Serves:  30

2  Cups  Flour
1  Cup  Sugar
1  teaspoon  Salt
1  teaspoon  Baking Powder
1  teaspoon  Baking Soda
1  Cup  Brown Sugar
2  Cups  Old Fashioned Oats
1  Cup  Chocolate Chips
2  Eggs
1  Cup  Oil
1  teaspoon  Vanilla

1.  Preheat oven to 350*.
2.  Mix together Flour, Sugar, Salt, Baking Powder, and Baking Soda
3.  Mix in Brown Sugar, Oats, and Chocolate Chips
4.  Combine Eggs, Oil, and Vanilla; stir into Chocolate Chip Mixture
5.  Press into a greased 15x10 jelly roll pan.
6.  Bake at 350* for 15-20 minutes or until lightly browned.
7.  Cool slightly before cutting.

If only Davy Crockett's wife had cooking this easy!

From food.com, submitted by Marg


Friday, March 23, 2012

Giveaway


There's a Giveaway going on right now over at Kendra Graber's blog Living In The Shoe and it is being sponsored by...me!


Actually, it's two Giveaways:  One Winner receives her (or his) choice of two sets of Postal Greeting Cards--a total of Two Dozen postcards!

--And--

One Winner gets her choice of  (3) Infant Hairclips -or- (2) Big Sister Hairclips -or- (1) Big Girl Hairclip or Jacket Pin, all in her choice of colors!

To enter just click on the link above and follow Kendra's instructions.
All of the terms, disclaimers, and qualifications are listed at Kendra's site.
I can't wait to pop these in the mail to you!

If you aren't the lucky winner, you can place an order.  Here's a link to my Facebook site,

Browse through the Photo Albums by clicking on the Photo tab on the left side of the page.
Make your selection and drop me a note, either by a Facebook message or by leaving a note at this blog site.  Prices are listed with each photo.  I can create any size Hairclip in any color pictured, so if you don't see what you want pictured, just ask!

Wednesday, March 21, 2012

Cheap Eats >> Minestrone Soup


Cheap Eats  >>  Minestrone Soup


2  Quarts  Beef Broth
2  Pints  Tomatoes, undrained  -or-  2  14.5-oz canned Tomatoes
2  14.5-oz  Beans, drained and rinsed - Use one can red beans (Kidney, Small Red Beans, etc.) and one can white beans (Cannelini, Pinto, Navy, etc.)
2-3  Carrots, sliced
1  Cup  Diced Celery
1 1/2  Cup  Shredded Cabbage
16-20- oz.  Meat, cooked - Italian Sausage, sliced or bulk -or- Ground Beef -or- Ground Turkey
1  Cup  Small Shell Pasta
3/4  Cup  Parmesan Cheese
and the Magic Ingredient:  1  7-oz  tub  Pesto  -or-  3/4 Cup Pesto

Extra Parmesan for serving

Mix all ingredients except the Shell Pasta, Parmesan Cheese, and Pesto.  Bring to a boil; reduce to a simmer.  Simmer for 1 to 1-1/2 hours.  Fifteen minutes before serving, stir in the remaining ingredients.  If too thick, thin with up to 2 cups additional Beef broth.  Serve hot with extra Parmesan.  Serves 10.

Other vegetables can be added:  Garbanzo Beans, Split Peas, Lentils, Green Beans, Kale, Swiss Chard, Spinach, and Cauliflower.  It just so happens that the only Cauliflower we had ready in the garden was the purple variety.  Yes, it does look rather odd in the soup.


Friday, March 16, 2012

St. Patrick's Day & Shamrocks

On Christ the Solid Rock I stand,
all other rocks are shamrocks!


St. Patrick's Day Cake

1  package  Yellow -or- White Cake Mix
1  small box  Pistachio Instant Pudding Mix
1/2  teaspoon  Almond Extract
4  Eggs
1 1/4  Cups  Water
1/4  Cup  Oil
7 or more  Drops  Green Food Coloring
Powdered Sugar

Preheat oven to 350*.  Combine all ingredients except Powdered Sugar in a large mixing bowl.  Blend, then beat at medium speed with electric mixer for 4 minutes.  Pour into a greased and floured 9x13 pan.  Bake for 45 to 50 minutes or until cake springs back when lightly pressed.  Cool in pan for 15 minutes; invert onto serving platter.  Sprinkle with powdered sugar.

Quick, easy, and good.  A recipe of my mother-in-law's.


Happy St. Patrick's Day!


Wednesday, March 7, 2012

Purim


Purim, that wonderful Jewish celebration of Esther's bravery, the defeat of Haman, and God's loving care for His people begins tonight at sundown and lasts for two days, ending Friday.  What better way could there be to join the celebration than by making Hamantaschen Cookies, or Haman's Hats?  These little sweet-filled cookies are a fun part of Purim celebrations.  And children, remember when Esther's story is read, don't forget to loudly stomp your feet, and boo and hiss at the every mention of Haman's name--drown out even the possibility that he might be remembered favorably. 

Here is a recipe for Hamantaschen; it's a little tricky to get them to turn out right, so read my notes which follow.  Enjoy!

Hamantaschen

2  Cups  Sugar
6-1/2 to 7  Cups  Flour
2  Tablespoons  Baking Powder
1/2  teaspoon  Salt
1/2  Cup  Orange Juice
1  Cup  Oil
4  Eggs

2  Eggs, beaten and mixed with 2  Tablespoons  Water

Filling:  Traditional fillings include Apricot Jam, Prune Jam, or Poppy Seed, but anything sweet may be used: thick jam or marmalade (jelly is too runny), chocolate or vanilla chips, peanut butter, Nutella; the possibilities are endless!

Sift the dry ingredients into a large mixing bowl, make a well in the center.  In another bowl, combine the Orange Juice, Oil, and Eggs until the Eggs are well blended.  Mix the wet ingredients into the dry ingredients, mixing well until it forms a ball of dough.  Refrigerate for at least 2 hours, or until well chilled.

Turn out all of the dough onto a well-floured board.  If the dough seems very soft, knead in the last 1/2-Cup Flour.  Roll out dough to 1/8-inch thickness or slightly more.  Cut into 3- to 4-inch circles, place on greased cookie sheets.

Place a slightly-rounded 1/2-teaspoon of Filling in the middle of the circles--it's better to be on the scant side than to have too much filling.  Too much and it will leak out.
Gently fold over the sides of the cookies, overlapping at the corners, to make a triangle.  For best success, do not leave much filling exposed.  Place cookie sheets in the freezer for 10 to 20 minutes to help them hold their shape while baking.

After the formed Hamantaschen have been frozen for 10 to 20 minutes,  brush the cookies with beaten Egg wash and immediately bake at 375-400* for 10 minutes, until light golden brown.

Makes 3-1/2 to 4 Dozen, depending on size.  Happy Purim!


My first batch, ready for the oven and looking so nice:


Here they are after baking:  not so nice


As you can tell, they flopped.

Big time.

Back to the recipe box...

I did some research, looking at seven or eight different recipes from various cooking and Jewish websites.  Here are some things I found:
  • Chill your dough
  • Overlap the corners, don't pinch them together
  • Cover up as much filling as you can
  • Freeze the Hamantaschen before baking to help them retain their shape
  • The longer you freeze them -20 minutes instead of 5 or 10- makes a big difference in reducing the 'spread' of the dough
  • Runny fillings leak more
  • Use a hotter oven temperature rather than a cooler temperature
  • Hamantaschen that 'rise' more in the oven have a more cake-like texture
  • Don't skip the Egg Wash--it gives the exterior a crisp crust while keeping the interior chewy
  • Ugly cookies still taste good
 I was quite pleased with what my second batch looked like:


until I saw what my final batch looked like:  THIS was what I wanted!


More flour, a longer freezing time, and a hotter oven made the difference!

Here's what the three batches look like side-by-side.  Makes the first flops look quite pitiful!


Here is a photo showing the overlapped corners before baking.  Compare it to the first pre-baked photo which shows pinched corners.


And here is what went to school with the children


Happy Purim to you!

I adapted my recipe from one published 3/4/2012 in the local paper, submitted by Andra Greenwald of Congregation Beth Shalom


Thursday, March 1, 2012

Fake It -- LARA Bites


Have you tried those energy/meal/healthy snack bars that are so popular?  You know, the 'granola bars' that are at the grocery check-out and retail for about $2 each?

Me neither.  Too Expensive.
Especially when each child is going to want his or her Very Own Bar.

And then....
We went to the Ocean with my husband's family.

And my Sister-In-Law offered me one of these.

And I ate,
well,
more than one.

And...
That's all, she wrote.

Enjoy!

Fake It  --  LARA Bites

2  packed Cups  pitted Medjool Dates
1/2  Cup  Unsweetened Coconut
SCANT 1/4  teaspoon  Vanilla  (do go easy on the Vanilla; these bites are not baked and if you use too much Vanilla the alcohol will overpower the Bites.  I learned this the hard way: my Vanilla spilled.)
1/2  teaspoon  Salt
1/4  Cup  Cocoa Nibs  -OR-  Mini Chocolate Chips

Pick through the Dates, removing any stem caps or pit pieces.  Place in a food processor in an even layer.  Layer the remaining ingredients in food processor, making certain that you don't dump the Salt in one location.  Process on High until well mixed.  Scoop out onto waxed paper in 1-inch balls (I used my smallest Pampered Chef cookie scoop); allow to dry for about one hour--this makes them less likely to stick together in your storage container.  Store in an air-tight container.

I doubled this and made about 3 dozen Bites.  A double recipe was almost too much for my food processor.

Adapted from Chocolate-Covered Katie's recipe.  I think that this could be changed up in a variety of ways:  Swap out some of the Dates for dried Apricots, Cherries, or Blueberries; swap the Cocoa Nibs for chopped toasted Almonds or Pecans... 

I wish I had more Dates in my cupboard...